|
Every proud homeowner is looking for new and better ways to improve the aesthetic of their homes, landscaping being the most common of all. This might include gardening, edging, terracing or pathing. Some of the reasons people do this, or even go so far as to hire professionals, range from increasing the overall market value of the home to having a cleaner, better-looking and filtered environment. One of the most preferred plants for landscaping is elephant’s ear. This is because, given their tropical background and large glossy leaves, they're very attractive in appearance. 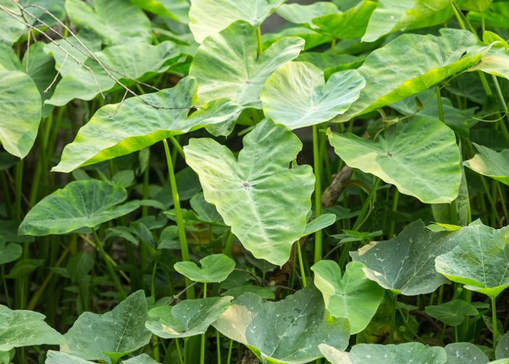 Elephant's Ear, or Colocasia esculenta However, simply buying the plant from a nursery is not enough; one has to put in some effort, considering your typical garden is an adaptation to the climatic conditions the plant is suited for. Water Any plant with long and thick stems like the elephant’s ear store a lot of water. Then, this would mean that they need to constantly be watered. This is particularly important when you choose to have the plant in a container, as containers tend to dry up quite fast. This, however, doesn’t mean that the plant should be overwatered. Brown tips at the end of the leaves are a classic indication of overwatering. On the other hand, depriving the plant of water will lead to drooping and discoloration of the leaves. How To Properly Water
Roots Elephant's ear has very aggressive roots and thus is perfect for the outdoors. However, if you opt to put it in a container, this may prove troublesome as you will be forced to change the container as the plant grows bigger. Still, putting the plant in a container is advisable as it gives you the option of moving it at will. Taming The Roots
The above helps in taming the otherwise aggressive roots of the plant. Light 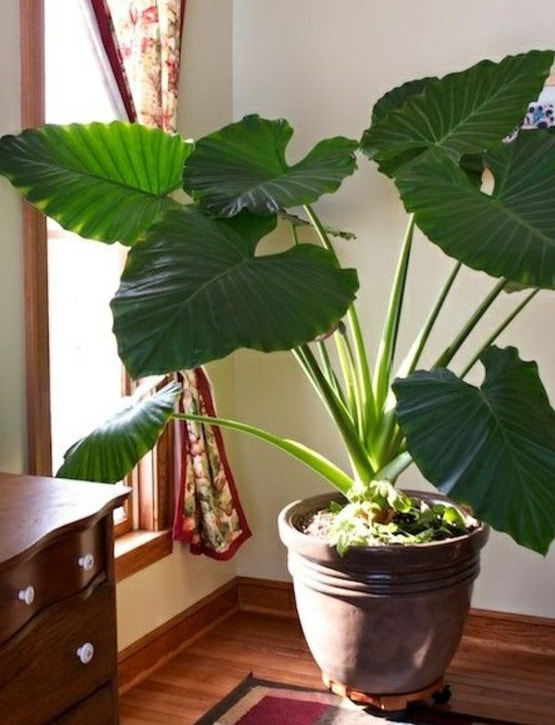 Elephant's Ear as a houseplant Many people who attempt landscaping with elephant’s ear fail because they don’t provide the plant with enough, and the right, light. This is a plant that does very well in the shade, but needs limited exposure to light, preferably the early morning sun. For this reason, it is advisable to have it in a container so as to be able to regulate the amount and type of light accessible by the plant. Giving It The Right Light
Fertilizer This is a hardy plant which is preferred for landscaping because of its beautiful leaves. These leaves need to kept hardy and glossy. Simply watering them isn’t enough, but they need fertilizer as well. What To Do Elephant's ear should be fertilized every month. Space Landscaping is an activity which requires a considerable amount of space. This is even more important where the plants one intends to grow are spacious like the elephant’s ear. On average, elephant's ear can grow up to 6-8 feet, depending on how you control the size. An advantage with this plant is that once a leaf is lost, a new one grows almost immediately to replace it. The disadvantage of this is that the new leaves may grow even larger especially if they grow from one of the big stems. Conclusion Elephant’s ear can be a great addition to your home landscape, but know that it requires some attention and care as opposed to some of the other plants which, once planted, only need watering. Thanks for reading. Feel free to check out our article on rock landscaping.
0 Comments
Rock landscaping can be a little bit intimidating. I am sure everyone has a story of looking at someone else's eye-catching layout and dreamed of having their own rock garden at home.  With that said, here are some tips on landscaping with rocks to get you off on a great foot: 1. Prepare the foundation with care. Unless you are starting by carving your garden out of a rocky hillside, you will be clearing some existing space to serve as your rock garden. If the area has had some vegetation, you can prepare your garden space by covering the desired area with newspapers, and then covering the paper with dirt. This will block both light and nutrients, and the vegetation will soon die out. 2. Decide what size your garden will be. It is important to decide how large or small your rock garden will be. You can get some great insights for your rock garden right here. A small location will make the construction job more manageable. A larger location will require a lot more rocks to be transported to the site. If you are uncertain as to which choice to make, start with a small rock garden on one side of the area you are considering. If the garden is a success, you can add to it over time. 3. Pick the color of your rocks. Rocks and stones come in many different colors. You should be able to find a wide range of colors at a specialty rock store. Another part of this choice is knowing the size of the rocks, as well as their appearance if they are broken into smaller pieces. Mix and match as you see fit to support the color scheme and layout you are planning for. 4. Plants or no plants? Rock gardens often have a number of plants which complement the rock arrangement. You need to account for the varying amounts of soil amongst the rocks, as well as pathways for roots to penetrate to get water and nutrients. To this end, I suggest consulting a seasonal plant guide to see what works well in your area. 5. Use small rocks as a mulch or filler material. When you begin placing plants around your rock garden, there will be gaps in the overall appearance of the garden. You can use small rocks or even pebbles to fill in these spaces. Try to match the surrounding colors to allow the pebbles to blend into the landscape. Have a look at this video for some great rock landscaping ideas: As you can see, rock landscaping does not need to be overwhelming. Use your sense of color and form to guide you in selecting your materials.
With the tips presented here, you have a great head start on preparing your own rock garden. Best of luck to you. Nurturing a plant and witnessing it bear fruit is a great experience. Though fulfilling, maintaining plants can be a difficult task. Plants require conscientious care and grooming. You may have wondered to yourself as to why your avocado plant leaves have turned brown; this problem needs to be addressed effectively. 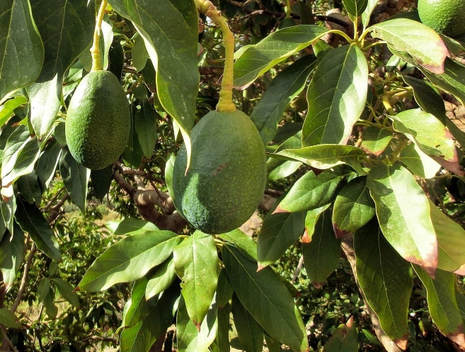 Most times, the cause of browning leaves is relatively simple and can be rectified once you identify the root cause. There could be several possible reasons, including:
Too Much Sunlight It could be that your plant is getting too much sunshine, which can cause burning. In this case, you need to change the position of the plant. If that isn’t possible, then you could arrange for some mechanism to block some sunlight from directly hitting the plant. Browning generally begins from the tip of the leaves and then gradually spreads to the entire leaf. Known as "tip burn", it happens when the chloride content in the soil increases drastically. Salt Accumulation Salt accumulation happens because the water used for irrigation is high in salt content. Avocado plants, if irrigated with rain water, will never have brown leaves, as rain water is alkaline and relatively speaking free of salts. So, then what is the answer? Relatively easy - irrigate the plant thoroughly. Leach the salts once a month by running water through the plant for as long as 24 hours. This will dislodge the salt that has accumulated around the plants roots and percolated deeper into the soil. Diseases or Mineral Deficiencies Browning could also happen because of disease caused by fungus. In this case, the avocado plant should be treated with a copper compound to stop the spread of the disease. Deficiency of minerals, especially iron, could also lead to browning of leaves as well as root rot. Balancing the soil pH helps in this regard. It's up to you to determine which of the above could be the cause of the browning, and then take steps to remedy the situation. Remember: if more than ten percent of the avocado’s foliage turns brown, it can lead to reduction in the yield. You should also think about combining the knowledge above with your front yard landscaping knowledge to achieve a beautiful result. For more on that, see this page on Carve Your Creation: carveyourcreation.com/diy-front-yard-landscaping-ideas-on-a-budget By following these tips, you can help ensure that your avocado plant grows healthy and delivers a good yield. Good luck! |
 RSS Feed
